2 HPC Basics
We all need to start somewhere when we work with High Performance Computing (HPC).
This chapter is a review of how HPC works and the basic concepts. If you haven’t used HPC before, no worries! This chapter will get you up to speed.
2.1 Learning Objectives
After reading this chapter, you should be able to:
- Define key players in both local computing and HPC
- Articulate key differences between local computing and HPC
- Describe the sequence of events in launching jobs in the HPC cluster
- Differentiate local storage from shared storage and articulate the advantages of shared storage.
- Describe the differences between a single job and a batch job.
2.2 Important Terminology
Let’s establish the terminology we need to talk about HPC computing.
- High Performance Computing - A type of computing that uses higher spec machines, or multiple machines that are joined together in a cluster. These machines can either be on-premise (also called on-prem), or in the cloud (such as Amazon EC machines, or Azure Batch).
- Cluster - a group of machines networked such that users can use one or more machines at once.
- Allocation - a temporary set of one or more computers requested from a cluster.
- Toolchain - a piece of software and its dependencies needed to build a tool on a computer. For example,
cromwell(a workflow runner), andjava. - Software Environment - everything needed to run a piece of software on a brand new computer. For example, this would include installing
tidyverse, but also all of its dependencies (R) as well. A toolchain is similar, but might not contain all system dependencies. - Executable - software that is available on the HPC.
- Shared Filesystem - Part of the HPC that stores our files and other objects. We’ll see that these other objects include applets, databases, and other object types.
- SLURM - The workload manager of the HPC. Commands in SLURM such as
srun, (see Section 2.4) kick off the processes on executing jobs on the worker nodes. - Interactive Analysis - Any analysis that requires interactive input from the user. Using RStudio and JupyterLab are two examples of interactive analysis. As opposed to non-interactive analysis, which is done via scripts.
2.3 Understanding the key players
In order to understand what’s going on with HPC, we will have to change our mental model of computing.
Let’s contrast the key players in local computing with the key players in HPC.
2.3.1 Key Players in Local Computing

- Our Machine
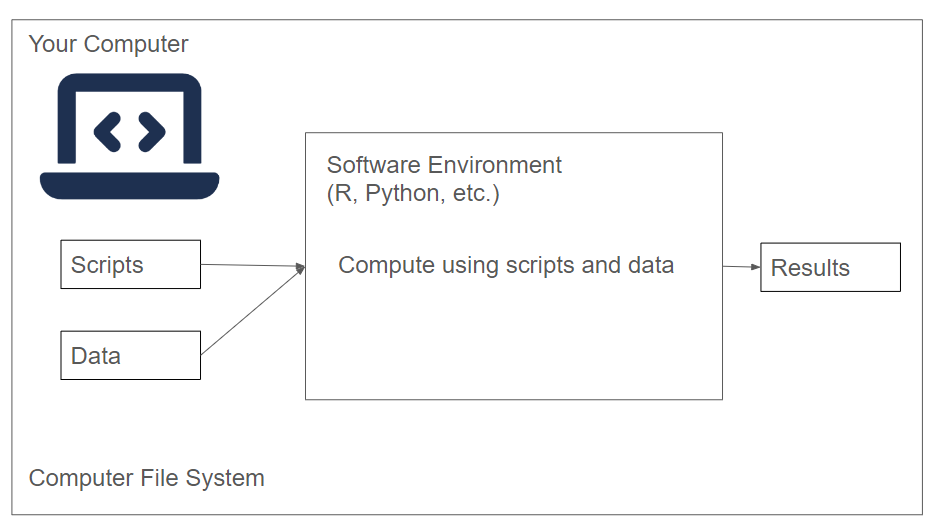
When we run an analysis or process files on our computer, we are in control of all aspects of our computer. We are able to install a software environment, such as R or Python, and then execute scripts/notebooks that reside on our computer on data that’s on our computer.
Our main point of access to either the HPC cluster is going to be our computer.
2.3.2 Key Players in HPC
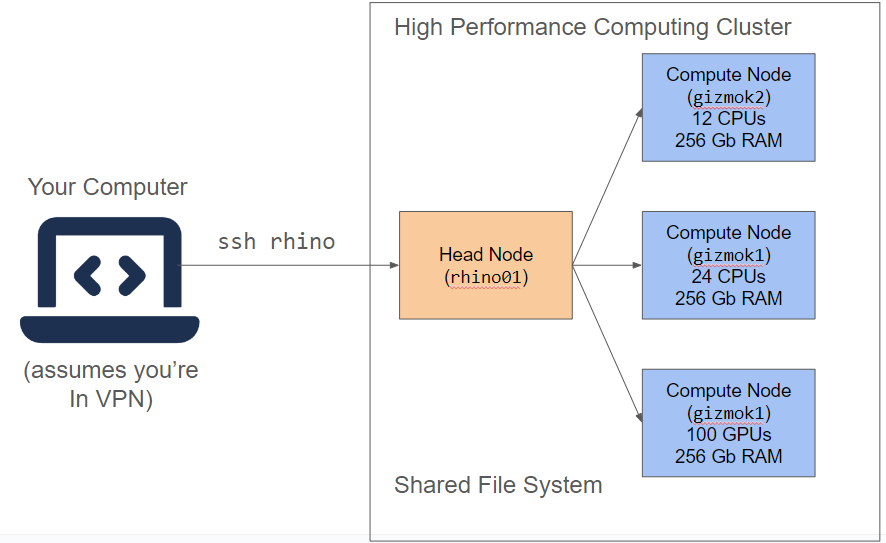
Let’s contrast our view of local computing with the key players in the HPC cluster (Figure 2.2).

- Our Machine - We interact with the HPC via the terminal installed on our machine. When we utilize HPC resources, we request them from our own computer using commands from the dx toolkit.
- Head Node - The “boss” of the cluster. It keeps tract of which worker nodes is doing what, and which nodes are available for allocations. Our request gets sent to the HPC cluster, and given availability, it will grant access to temporary worker.
- Worker Node - A temporary machine that comes from a pool of available machines in the cluster. We’ll see that it starts out as a blank slate, and we need to establish a software environment to run things on a worker.
- Shared Filesystem A distributed filesystem that can be seen by all of the nodes in the cluster. Our scripts and data live here.
2.3.3 Further Reading
- Working on a remote HPC system is also a good overview of the different parts of HPC.
The gizmo cluster at Fred Hutch actually has 3 head nodes called rhino (rhino01, rhino02, rhino03) that are high spec machines (70+ cores, lots of memory). You can run jobs on these nodes, but be aware that others may be running jobs here as well.
The worker nodes on the gizmo cluster all have names like gizmoj6, depending on their architecture. You can request certain kinds of nodes in an allocation in several ways:
- When you use
grabnode(?sec-grabnode) - In your request when you run
srunorsbatch - In your WDL or Nextflow Workflow.
2.4 Sequence of Events of Running a Job
Let’s run through the order of operations of running a job on the HPC cluster. Let’s focus on running an aligner (BWA-MEM) on a FASTQ file. Our output will be a .BAM (aligned reads) file.
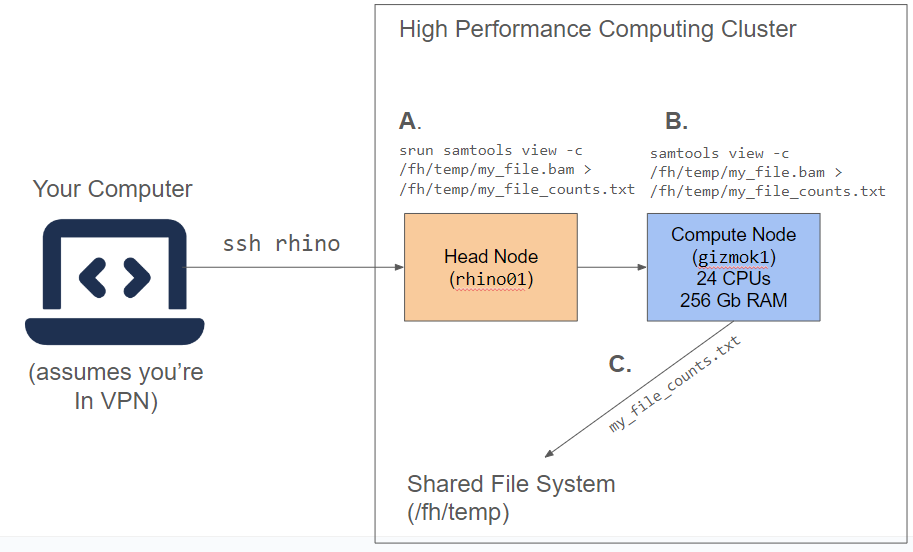
Let’s go over the order of operations needed to execute our job on the HPC cluster (Figure 2.3).

A. Start a job using srun to send a request to the cluster. In order to start a job, we will need two things: software (samtools), and a file to process from the shared filesystem (not shown). When we use srun, a request is sent to the cluster.
B. Head node requests for a worker from available workers; worker made available on cluster. In this step, the head node looks for a set of workers that can meet our needs. Then the computations run on the worker; output files are generated.** Once our app is ready and our file is transferred, we can run the computation on the worker.
C. Output files transferred back to project storage. Any files that we generate during our computation (53525342.bam) must be transferred back into the shared filesystem.
When you are working with an HPC cluster, especially with batch jobs, keep in mind this order of execution. Being familiar with how the key players interact on the cluster is key to running efficient jobs.
2.4.1 Key Differences with local computing
As you might have surmised, running a job on the HPC cluster is very different from computing on your local computer. Here are a few key differences:
- We don’t own the worker machine, we only have temporary access to it. A lot of the complications of running HPC computations comes from this.
- We have to be explicit about what kind of machine we want. We’ll talk much more about this in terms of machine types and classifieds.
2.6 Requesting Machines
How do you request a set of machines on the HPC? There are multiple ways to do so:
- Open an Interactive shell on a Node
- As part of a job using
srunorsbatch - Using Cromwell or Nextflow
In general, we recommend
2.7 Scattering: Distribute the Work

So far, everything we’ve seen so far can be run on a single computer. In the cluster, we have access to higher spec’ed machines, but using the cluster in this way doesn’t take advantage of the efficiency of distributed computing, or dividing the work up among multiple worker nodes.
We can see an example of this in Figure 2.4. In distributed computing, we break our job up into smaller parts. One of the easiest way to do this is to split up a list of files (file1.bam, file2.bam, file3.bam) that we need to process, process each file separately on a different node, and then bring the results back together. Each node is only doing part of the work, but because we have multiple nodes, it is getting done 3 times faster.
You can orchestrate this process yourself with tools such as sbatch, but it is usually much easier to utilize workflow runners such as Cromwell/PROOF (for .wdl files) or Nextflow (for .nf files), because they automatically handle saving the results of intermediate steps.
Trust me, it is a little more of a learning curve to learn Cromwell or Nextflow, but once you know more about it, the automatic file management and node management makes it much easier in the long run.
At Fred Hutch, we have two main ways to run workflows on gizmo: Cromwell and NextFlow. Cromwell users have a nifty GUI to run their workflows called PROOF.